
If you've been trying for months without success and your tests keep coming back "normal," the explanation may be somewhere a scan can't reach.
Diagnostic Hysteroscopy and Laparoscopy is a combined fertility diagnostic operation that examines both areas at once, within the uterus and around the exterior of the uterus, fallopian tubes and ovaries, in a single sitting under anaesthesia.
This simple guide leads you through what the operation truly involves: how the two scopes work together, the dye test that checks whether your tubes are open, what the findings mean for your next step, and how to prepare and recover. Because sometimes the true reason you haven't conceived is exactly what imaging and an HSG silently leave out.
What Is Diagnostic Hysteroscopy and Laparoscopy?
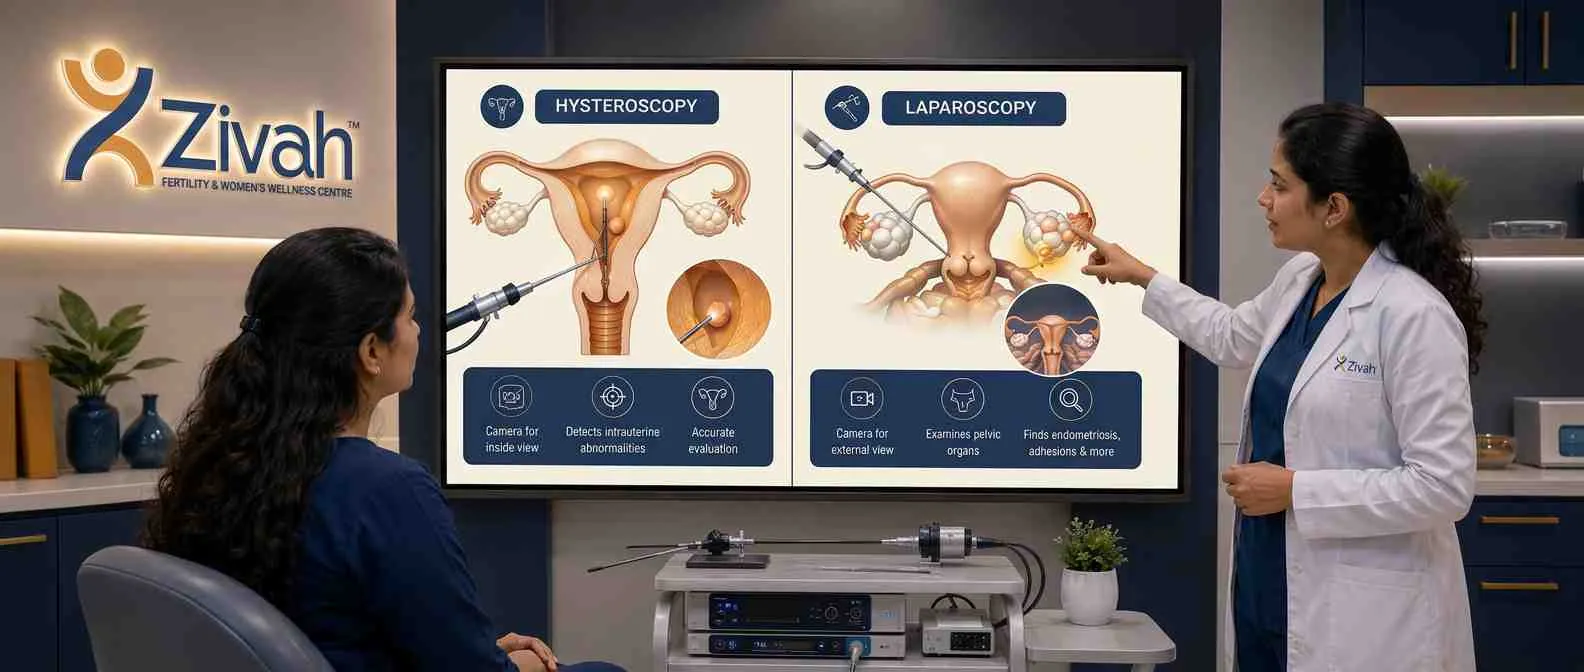
Diagnostic Hysteroscopy and Laparoscopy is a combined procedure that uses two small cameras to look at two places at the same time, inside the womb and around the outside of the uterus, tubes and ovaries. This combination method is called as hysterolaparoscopy by doctors.
Hysteroscopy: The Camera Inside the Uterine Cavity
A hysteroscopy surgery looks within the uterus, where scans are least effective. A hysteroscope is a narrow illuminated telescope sent through the cervix with no incisions whatsoever. This “camera in uterus” surgery, a kind of uterine endoscopy, provides a direct live view of the uterine lining.
Laparoscopy: The Keyhole View of the Pelvis
Diagnostic laparoscopy looks the opposite way, around the outside. A laparoscope looks at the laparoscopic pelvic area, the outside of the uterus, ovaries and tubes, through a small keyhole around the navel. This pelvic endoscopy finds surface issues such as endometriosis that the interior view misses.
Why Doctors Combine Hysteroscopy and Laparoscopy into Hysterolaparoscopy
Fertility difficulties might be inside the uterus, outside it or both. A hysterolaparoscopy, a single-sitting fertility operation combining hysteroscopy and laparoscopy under one anaesthetic, gives the full image. This is why this combination fertility diagnostic surgery has become a trusted stage in the assessment.
Why Hysteroscopy & Laparoscopy Matter in Infertility
Blood tests and scans can only go so far. And when they keep coming back “normal” but you still aren’t getting pregnant, this surgery comes into play. A direct surgical checkup for female infertility that discovers what imaging discreetly overlooks.
Who Is Advised to Have Hysteroscopy & Laparoscopy
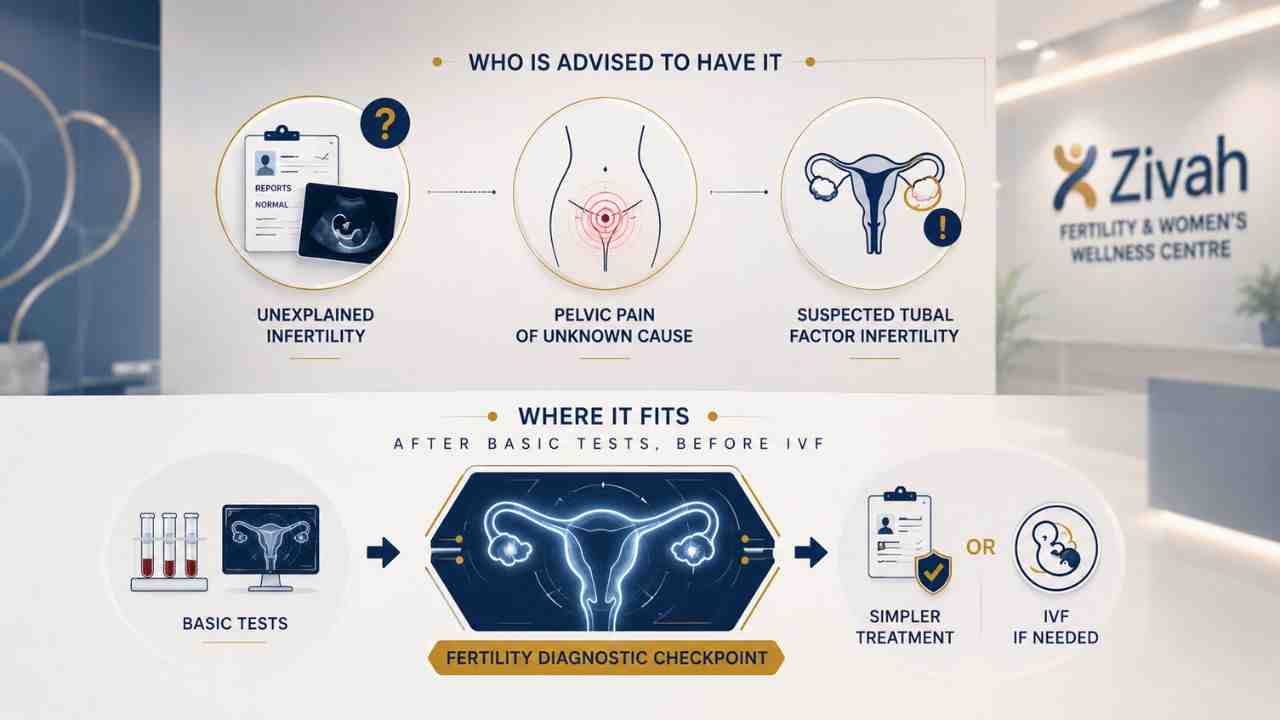
It is frequently indicated when the problem is concealed following basic diagnostics. Your doctor may recommend it if you have:
- Unexplained infertility - normal reports but no pregnancy.
- Pelvic pain of unknown cause – a clue that scans haven’t detected something.
- Suspected tubal factor infertility - blocked tubes that need direct confirmation.
Where It Fits: After Basic Tests, Before IVF
Think of it like a checkpoint. This is where it comes in: a fertility diagnostic process done once early investigations are complete, but before you commit to treatment, to check if IVF is really needed, or whether a simpler remedy may restore your natural odds first.
Unexplained Infertility, Recurrent Pregnancy Loss and Failed IVF Cycles
It is most useful in the toughest cases, when infertility has no identifiable cause, when pregnancies are miscarried frequently, or when IVF cycles continue to fail. Direct visualisation of the pelvis and uterus often discloses the unrecognised reason for the recurring failure to conceive.
Hysteroscopy vs Laparoscopy: Key Differences Explained
These two are commonly confused, yet they are easy to distinguish. One looks within the womb; the other looks outside it. When you figure out what does what, it makes the process a whole lot simpler to grasp.
Access, Incision and What Each Scope Examines
The biggest difference is how each camera enters. You go the natural way through the cervix, and there are no cuts at all, no wounds on your skin. The other (laparoscopic) involves one to three small keyhole holes at the navel. Thus one looks into the uterine cavity from within, the other into the pelvic cavity from without.
Hysteroscopy vs Laparoscopy for Fibroids
It depends on where the fibroid is. Submucous fibroids are growths that protrude into the womb and may be accessible and removed via the cervix without the need for an incision. The ones on the exterior wall (subserosal or intramural) are beyond its grasp and are dealt with using the keyhole route.
Laparoscopy vs Laparotomy: Keyhole vs Open Diagnostic Surgery
This is a different contrast: less invasive vs open surgery. The keyhole method employs small cuts; a laparotomy is one big cut in the abdomen. They both look at the same organs, but the keyhole procedure results in less discomfort, less scarring and a far quicker recovery.
Hysteroscopy vs Laparoscopy: Route, Incision and Recovery Side-by-Side
| Feature |
Diagnostic Hysteroscopy |
Diagnostic Laparoscopy |
|---|---|---|
| Entry route |
Through the cervix (transcervical) |
Through the abdominal wall, near the navel |
| Incision |
None, no skin cuts |
1–3 keyhole cuts (5–10 mm) |
| Organs viewed |
Inside of the uterine cavity |
Outer uterus, ovaries, tubes, pelvic cavity |
| Anaesthesia |
Light general or short sedation |
General anaesthesia |
| Primary purpose |
Check the uterine lining and tube openings |
Check pelvic organs and tubal patency |
| Typical recovery |
Back to routine in a day or two |
Full activity in about 3–7 days |
How Diagnostic Hysteroscopy and Laparoscopy Is Performed at Zivah
It’s a simple process: one camera and then the other, done while you’re asleep and comfy. Here’s what occurs at Zivah, one step at a time.
Anaesthesia and Timing in Your Cycle
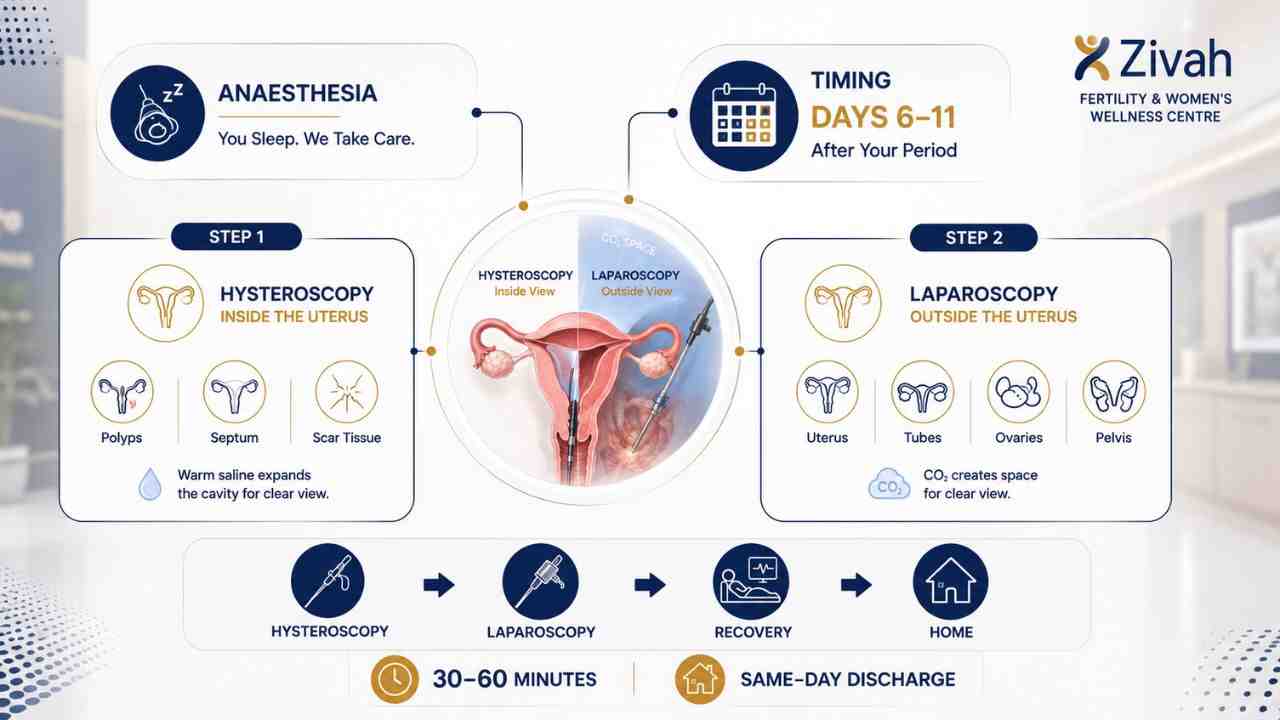
Yes, you will be under general anaesthetic, so you will not feel anything during the whole process. Timing is also important: it’s best to plan it immediately after your period finishes, around days 6 to 11. That window preserves the uterine lining thin and clean and safely rules out the possibility of an early pregnancy before the dye test.
Step 1: Hysteroscopy - Cervical Dilation and Cavity Inspection
The scope is then sent through the cervix, which is gradually dilated with small dilators. Next, warm saline is pumped into the womb, expanding it out like a balloon so one can see clearly. Your surgeon will check for polyps, septum or scar tissue in the lining and apertures of the tubes.
Step 2: Laparoscopy - Pneumoperitoneum and Pelvic Survey
Now, the view from outside. We use Carbon dioxide gas to push the abdominal wall away from the organs for space to look. Then it spreads throughout the ovaries, the outside of the womb, the tubes and the pouch of Douglas (the region behind the womb where troubles typically lie in wait).
How Long the Procedure Takes and When You Go Home
Most examinations last from 30 to 60 minutes. It’s a day-care surgery; you come in, get it done, relax for a few hours and go home the same day.” Normally, no overnight stay is needed.
Procedure at a Glance: Surgical Phase, Scope and What's Assessed
| Surgical Phase |
Scope & Instrumentation |
What Is Assessed / Visualised |
|---|---|---|
| Step 1 - Hysteroscopy |
Hysteroscope + dilators, saline distension |
Uterine lining and tube openings - polyps, septum, synechiae (scar tissue) |
| Step 2 - Laparoscopy |
Laparoscope + CO₂ insufflation, probe |
Outer uterus, ovaries, fallopian tubes, pelvic peritoneum, pouch of Douglas |
| Dye check |
Cannula + methylene blue dye |
Whether the tubes are open (covered next) |
The Dye Test: How Chromopertubation Confirms Whether Your Tubes Are Open
If your tubes get blocked, sperm and egg will never meet; hence, this is one of the most important answers the treatment provides. Chromopertubation is a laparoscopic procedure that provides direct visualisation of tubal patency, unlike an HSG, which uses X-ray dye to evaluate it without surgery. Your surgeon does not guess at the outcome. They see it happen.
How the Dye Test Works
A soft cannula is inserted through the cervix, and a blue colored dye is injected gently into the womb. Your surgeon is looking at the tubes on the laparoscopic screen in real time to check whether the dye passes through and flows freely out the far end.
Reading the Result: Open Tubes vs Cornual or Distal Block
The tube is open, which means free flow from the fimbrial ends. If the dye stops at the intersection of the tube and the womb, that's a cornual block. If it pools without escape, the clog is at the far end. It may be one tube, or it could be both, and that makes a difference in what happens next.
What Diagnostic Hysteroscopy and Laparoscopy Can Detect
This is where the solutions ultimately develop. Two views in one sitting, and your doctor understands at the end what has really been standing between you and a pregnancy. Some reasons exist in the womb, quietly changing the surface where an embryo must rest.
Others are outside it, pulling the anatomy out of position and completely blocking the tubes. Both are important, and this is the only assessment that combines both together, in one visit.
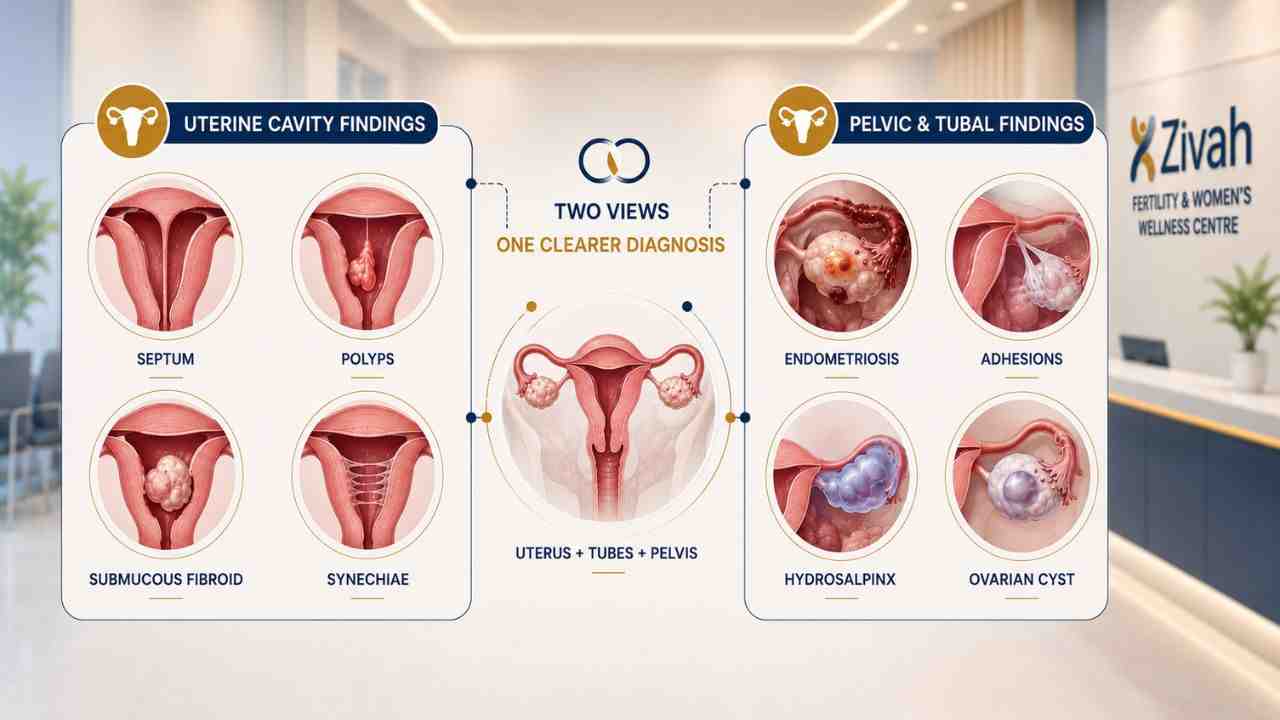
Uterine Cavity Findings: Septum, Polyps, Submucous Fibroids, Synechiae
The camera can show a dividing wall of tissue that has been there since birth, soft growths on the lining, fibroids pressing into the cavity, or scarring left from a previous infection, D&C or earlier surgery inside the womb. Even a cavity that seems normal on ultrasonography might be hostile to implantation.
Pelvic and Tubal Findings: Endometriosis, Adhesions, Hydrosalpinx
Outside the womb, however, the image usually changes entirely. The scope can find endometrial lesions, sticky bands holding the ovaries and tubes together, a tube bloated with trapped fluid or a cyst on the ovary, none of which are consistently visible on a regular scan.
How a Confirmed Diagnosis Changes Your Next Step
A clear finding: Redraft the plan. If the tubes are open and the cavity is healthy, a natural birth or IUI may still be worth it. Blocked tubes or a tube full of fluid pretty much always means IVF, saving you months of trying things that were never going to succeed.
Conceiving After Hysterolaparoscopy: Outcomes and Timing
Many women conceive after that, particularly if a fixable problem was diagnosed and addressed at that same visit. Most are told to wait a cycle or two before attempting, to allow the womb and pelvis to recover. Your doctor will tell you when the time is appropriate.
Findings by Region, Detecting Scope and Impact on Your Fertility Pathway
| Anatomical Region |
Potential Finding |
Primary Scope Used |
Impact on Your Fertility Pathway |
|---|---|---|---|
| Uterine cavity |
Uterine septum |
Hysteroscopy |
Distorts the cavity and impairs embryo implantation |
| Uterine cavity |
Endometrial polyp / submucous fibroid |
Hysteroscopy |
Occupies the lining and interferes with implantation |
| Uterine cavity |
Intrauterine adhesions (synechiae) |
Hysteroscopy |
Scarred lining reduces the chance of an embryo settling |
| Pelvis |
Endometriosis |
Laparoscopy |
Inflammation and scarring impair egg pickup and conception |
| Pelvis / adnexa |
Adhesions, ovarian cyst |
Laparoscopy |
Distorts anatomy; tubes and ovaries lose normal contact |
| Fallopian tubes |
Hydrosalpinx |
Laparoscopy |
Trapped fluid can leak into the womb and hinder implantation |
| Fallopian tubes |
Blocked tubes (unilateral / bilateral) |
Laparoscopy + dye test |
Blocks natural conception; usually redirects the plan to IVF |
Operative Hysterolaparoscopy: When Diagnostic Evaluation Becomes Treatment
Sometimes just a look is enough. But if a problem is detected and can be safely fixed there and then, your surgeon doesn't have to close shop and bring you back another day.
When Diagnosis Converts to Same-Sitting Treatment
If scar tissue is present, it can be discharged. A polyp or fibroid pushing into the cavity can be shaved off. A splitting septum can be clipped. Tubes and ovaries locked together can be gently released. The assessment just keeps going, no second admission, no second anaesthetic, no second recovery.
You can't get everything done in one sitting. Some larger or more difficult results may be better handled in a scheduled, separate surgery. That option will be explained by your surgeon afterwards.
Instruments Used: Resectoscope and Electrosurgical Tools
The tools go through the same scopes that are currently there. Inside the uterus, a delicate cutting instrument cuts tissue, and energy-based devices seal small veins and remove lesions in the pelvis precisely, with low bleeding and no unnecessary incisions.
Preparing for Diagnostic Hysteroscopy and Laparoscopy
It is easy to prepare, and most of the preparation is done the week before. Your staff will walk you through the process, but knowing what to expect will make the day a lot less intimidating.
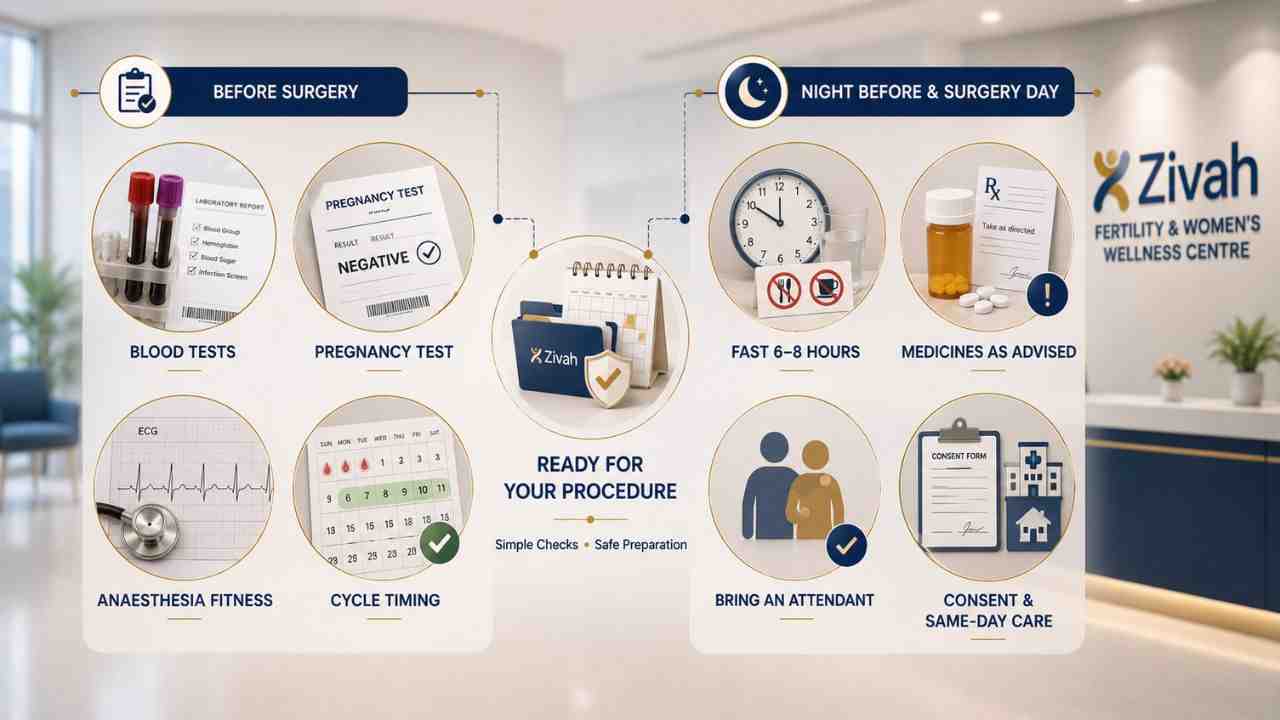
Tests and Cycle Timing Before Surgery
First, there are certain regular checks, generally a few days beforehand:
- Blood testing - blood group, sugar, haemoglobin, infection screening.
- A pregnancy test - required since if you could be pregnant already, the dye test cannot be done.
- A physician's or ECG check - occasionally needed before anaesthesia, depending on your age and health.
Timing is also crucial. Your menstruation finishes before the surgery, so there is no bleeding to get in the way of the view within the womb.
Instructions the Night Before and Day of Surgery
The guidelines are simple and following them keeps anaesthesia safe:
- Stop eating and drinking from midnight or as your team recommends, usually 6 to 8 hours of fasting.
- Do not stop taking any medicine, especially blood thinners, without your doctor's advice.
- Bring a friend, wear casual clothing and leave your jewellery and make-up at home.
- You will be asked to sign a permission document covering the examination and any necessary corrections.
You will be admitted in the morning and, in most cases, be home the same evening.
Pre-Procedure Checklist: Action, Timing and Clinical Reason
| Preparation Category |
Action Required |
Clinical Justification |
|---|---|---|
| Cycle timing |
Schedule on days 6–11, after bleeding stops |
Thin, clear lining gives the best view; avoids testing during a possible pregnancy |
| Pregnancy test |
Done on admission |
The dye test must not be performed if you are pregnant |
| Routine bloods |
Haemoglobin, blood group, sugar, infection screen |
Confirms you are fit for anaesthesia and surgery |
| Fasting |
No food or water for 6–8 hours before |
Prevents complications under general anaesthesia |
| Medications |
Pause blood thinners as advised |
Reduces bleeding risk during the procedure |
| Consent |
Signed before surgery |
Covers both diagnosis and any same-sitting correction |
Recovering From Two Procedures at Once: What to Expect
The two procedures are done jointly. So recovery is two overlapping parts. A little discomfort within the womb. And a little in the abdomen. They both settle in fast.
The First 48 Hours: Gas Pain, Bloating and Spotting
The strangest thing, and the one that surprises most women, is a discomfort in the shoulders and upper chest. It's the residual gas from the abdomen pushing on a nerve. It goes away in a day or two. Light walking will get rid of it more quickly than resting.
You could notice a swollen belly, some soreness around the little cuts, and a little bleeding or cramping as your uterus gets back to normal. Use a pad instead of a tampon. Rest as much as your body tells you to.
Return to Work, Activity and Precautions
Most women are back to their usual schedule in three to seven days, depending on what was done. Desk work is typically acceptable after a few days; anything challenging takes a bit longer.
Avoid heavy lifting, intense activity, and swimming for a couple of weeks. Ask your doctor when it's safe to resume intercourse, and keep the small wounds clean and dry while they heal.
Recovery Timeline: What's Normal and When to Contact Zivah
| Timeframe |
What Is Normal |
When to Seek Help |
|---|---|---|
| 0–48 hours |
Shoulder ache, bloating, mild cramps, light spotting |
Severe pain, heavy bleeding, fever |
| Day 3–7 |
Discomfort easing, energy returning |
Pain worsening, redness or pus at incision |
| Week 2+ |
Wounds healed, normal activity resumed |
Foul-smelling discharge, persistent fever |
| Any time |
Gradual, steady improvement |
Fainting, breathlessness, calf pain or swelling |
Is Diagnostic Hysteroscopy and Laparoscopy Safe? Risks and Side Effects
It is a routine, least intrusive surgery and serious problems are uncommon. But no operation is without danger, and you need a complete picture before you approve.
Side Effects vs Serious Complications: What's Common and What's Rare
Common side effects are modest and short-term: bruises around the incision sites, bloating, Light spotting and occasional nausea from the anaesthesia. They settle down within days.
Really severe ones are so rare, I swear. The commonest is a minor rip in the wall of the womb which generally heals on its own. Injury to the bladder, intestines or blood vessels is even less common, but may need further operation. Infection and reactions to anaesthesia are also uncommon.
Who Is at Higher Risk During Hysterolaparoscopy
Some women are at somewhat increased risk compared to others. Previous abdominal or bowel surgery, severe endometriosis, substantial scarring, previous pelvic infection and being significantly overweight or underweight can all complicate the process. Before the procedure, your surgeon will check your medical history and explain what it means for you.
Why Choose Zivah for Your Combined Fertility Evaluation
Where you get this done is important. The value is in how well it's done, and in what your team can do the instant something is uncovered. At Zivah, we will try to diagnose and correct at the same time whenever it is safe. If a scar, polyp, or septum is identified, it can often be repaired at the same appointment under the same anaesthetic, with fewer treatments and a clear response much sooner.
Single-Sitting Diagnosis and Treatment at Zivah
If your results continue to come back normal and you still don't have answers, the next step is a consultation. We'll look at your past and walk you through what's next.
Unlike a scan, Diagnostic Hysteroscopy and Laparoscopy provide you the only way to assess the interior of the womb directly, to see the pelvis clearly and to do a dye test to see if your tubes are open, there and then. Whatever it discovers, you go away knowing instead of wondering, since the reason you haven't conceived was never nowhere. It was just somewhere a scan couldn't go.